MICROSOFT TEAMS Integration
FILE MIGRATION, BACKUP AND DATA SYNCHRONIZATION
Microsoft Teams brings together people, conversations, and content across Microsoft Office 365 in a structure called Team, which can be e.g. projects or company departments. By providing an integrated experience that links together chat conversations, document storage, meetings, and calendar events in Channels, Microsoft Teams creates a better experience for workgroups to focus on team activities and knowledge sharing.
Team members are able to find all information in one place - without the need to switch between the different apps like e.g. OneNote (note taking), Planner (task management) or SharePoint (lists and documents) anymore.
Documents or other files on traditional file servers or NAS can be easily synchronized to or from Microsoft Teams with the Layer2 Cloud Connector. Use it for document and file migration, backup, and permanent two-way sync. The tool runs as a Windows Service locally in your network, or on your own Azure Virtual Machine.
Keep your team members informed about data changes in 150+ widely used IT-systems and apps without any coding.
Connect your Microsoft Teams step-by-step
Contents
1. Configuring Microsoft Teams
2. Configuring the Layer2 Cloud Connector
2.2 Configuring the Data Entity 1
2.3 Configuring the Data Entity 2
1. Configuring Microsoft Teams
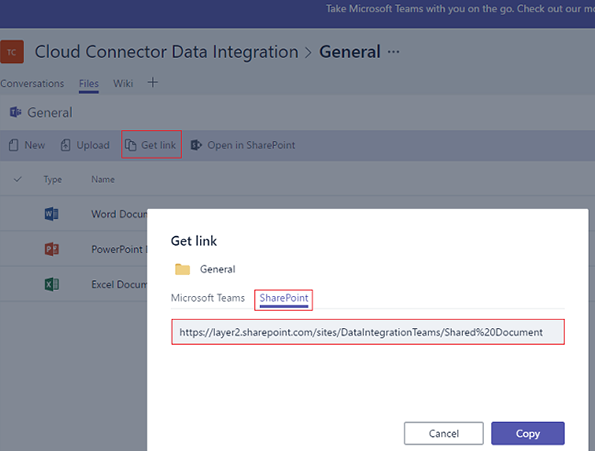
Behind every Microsoft Teams channel is a SharePoint Online page. In order to sync files to our Microsoft Teams channel we will need to retrieve the underlying SharePoint Online library URL.
The screenshot below shows where to find the URL, copy it as we will need it later for the connection string.
2. Configuring the Layer2 Cloud Connector
2.1. Creating a new connection
Create a new connection by using the Create New Connection option in the Actions pane (right-hand side). The new connection will appear at the bottom of the Connection Manager List (left-hand side). Click on your newly created connection to open the connection configuration settings.
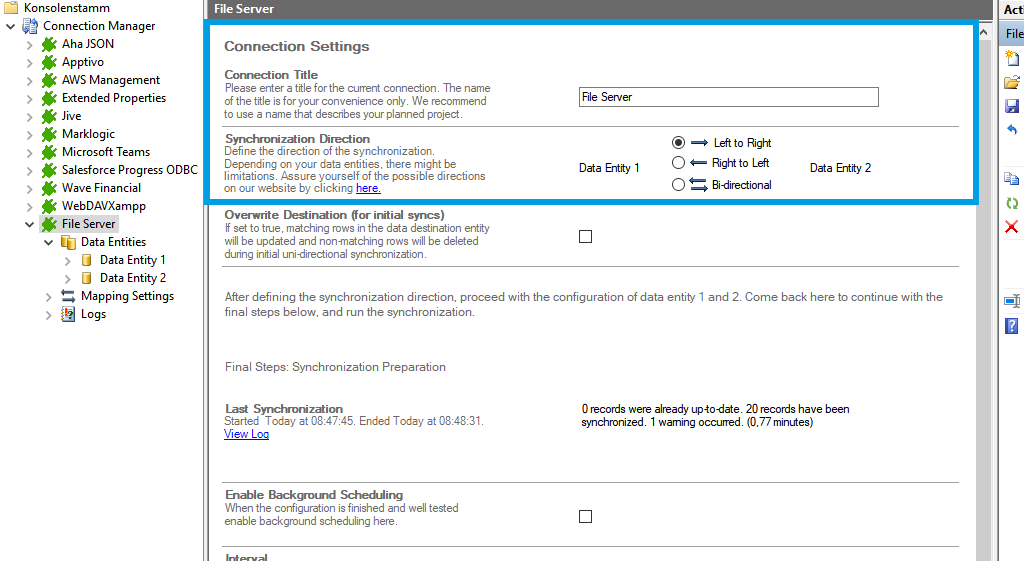
Choose a meaningful name for your connection and replace the current "New Connection" Connection Title with it.
Connections to File Server can be bi-directional. An initial connection should always be uni-directional to assure that both data entities are identical before switching to bi-directional. Therefore, choose Left to Right as Direction. You can change this setting after your initial synchronization finished successfully.
2.2. Configuring the Data Entity 1
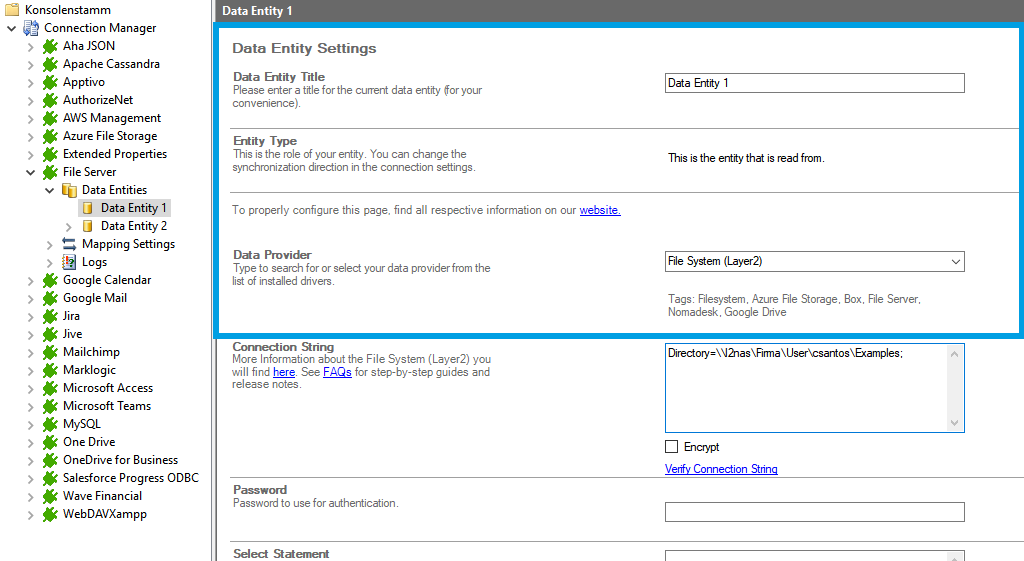
We will now set up our Data Entities. Go to the data entity “Data Entity 1” to open the configuration settings.
Choose a Data Entity Title. It is recommended to give your entities meaningful names to maintain an overview when you decide to set up multiple connections.
Select the Data Provider for File System from the data provider list. You can search for File System by typing into the selection box.
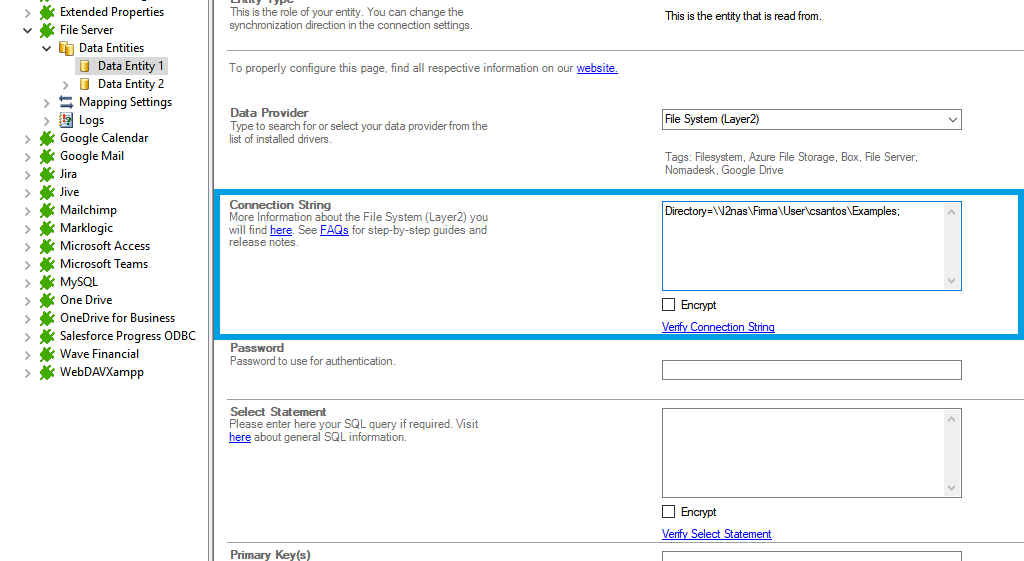
For the Connection String, we need the in step 1 mentioned information. You can copy the below connection string and adjust it to match your gathered information. Use the Verify Connection String option to evaluate if the provided connection string is valid.
Directory=\\l2nas\Firma\User\csantos\Examples;
- "Directory=path;" this property defines the folder where the files are in you want to synchronize.
The Select Statement text box is used to define specific data queries, e.g you can filter for specific filetypes. We do not need it in this case. Save your changes by using the right-hand pane option Save Changes .
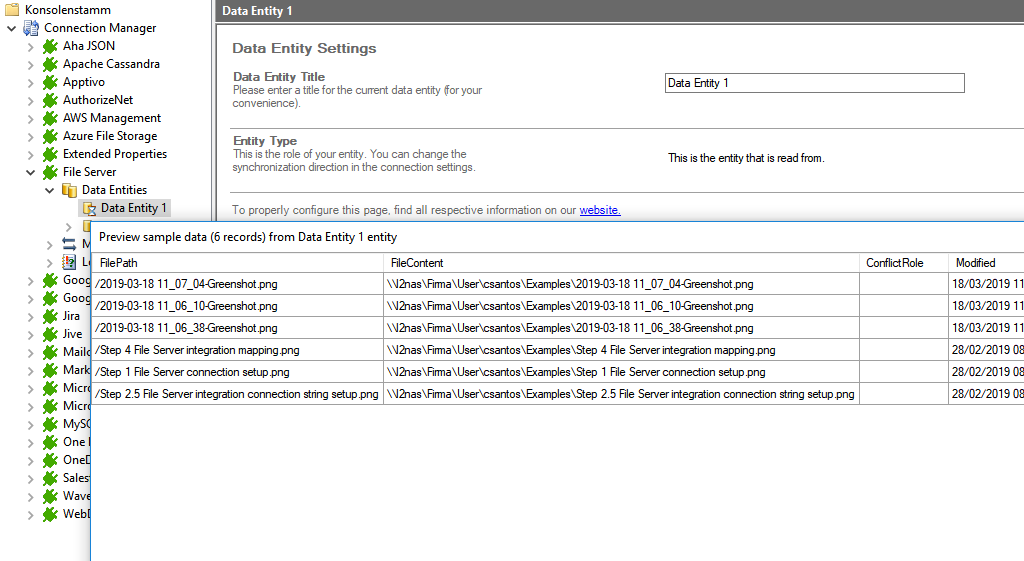
To check if all necessary columns are received, you can use the Preview Data option on the right-hand pane which will provide you with a pop-up window showing your sample data from your File Server entity.
2.3. Configuring the Data Entity 2
We are going to send the data to your Microsoft Teams channel. It's required that you set up this library prior to the next steps. Your channel should contain matching columns according to your source entity.
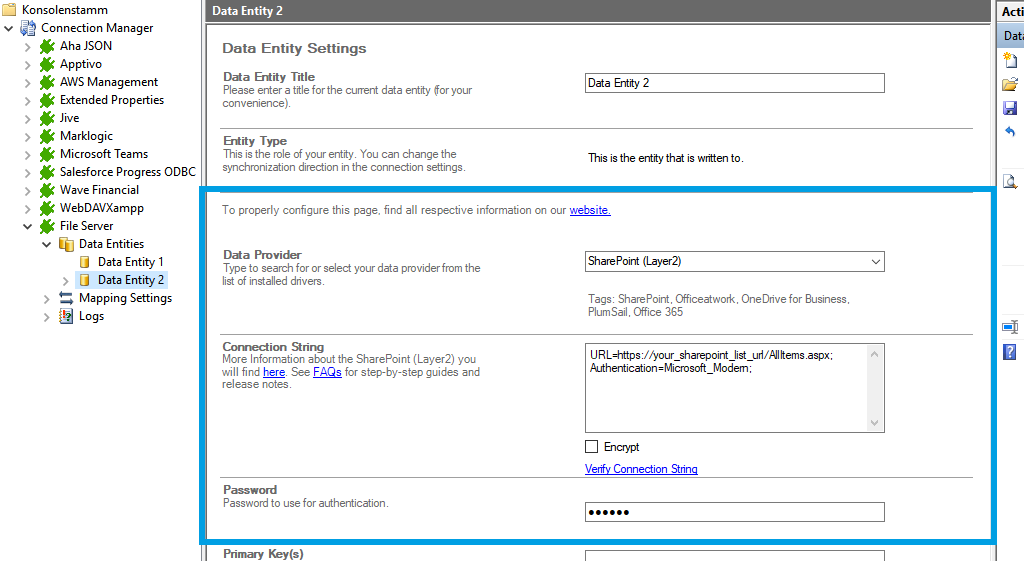
Use the left-hand pane to switch to the data entity "Data Entity 2". We will be using the Layer2 SharePoint Provider for this setup.
For more information about the SharePoint provider visit:
https://www.layer2solutions.com/support/cloud-connector-faqs/layer2-csom-sharepoint-ado-net-provider .
You can copy the below Connection String which contains the minimum of required properties to connect to your custom SharePoint Online Document Library.
URL=https://your_custom_sharepoint_library_url/Forms/AllItems.aspx;Authentication=Microsoft_Modern;[email protected];
- "URL=https://your_custom_sharepoint_url/Forms/AllItems.aspx;" this property defines the URL of your custom document library that will be addressed.
- "Authentication=Microsoft_Modern;" this property will determine the authentication method used. Microsoft_Modern is the default authentication method to access Microsoft Office 365 / SharePoint Online and should work in most cases, even if the SharePoint site is connected to an ADFS. This authentication does not need any further connection string settings, other than the URL of the connected system.
Save your changes by using the right-hand pane option Save Changes .
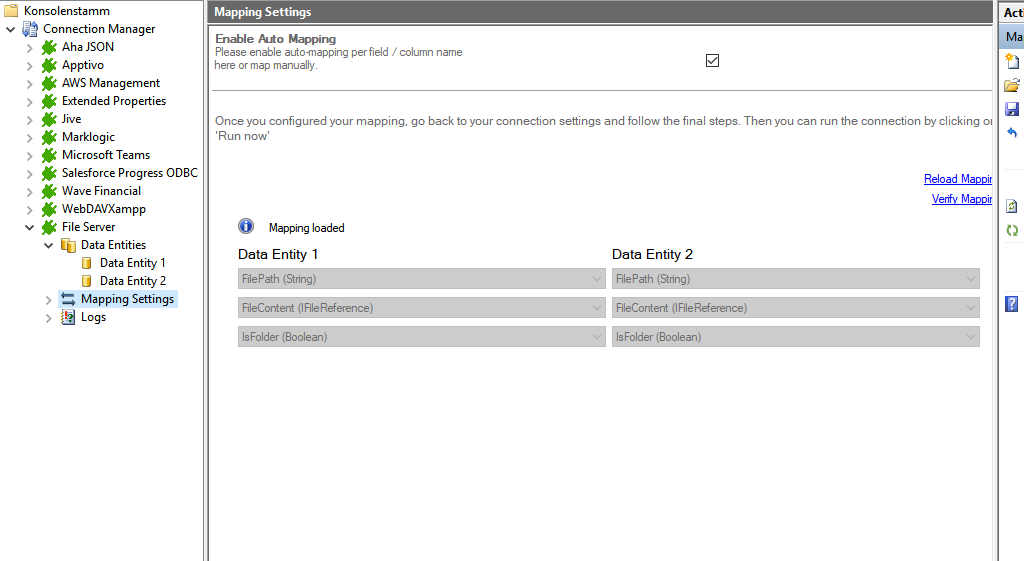
In the next step, we will configure our mapping settings. Click on the Mappings option on the left-hand pane. If your fields from SharePoint are named identical to the fields from your source system, the Enable Auto Mapping option will match those columns. Disabling this option allows you to match your columns as needed. We enabled auto-mapping in our setup. Save your changes by using the right-hand pane option Save Changes.
2.4. Running your connection
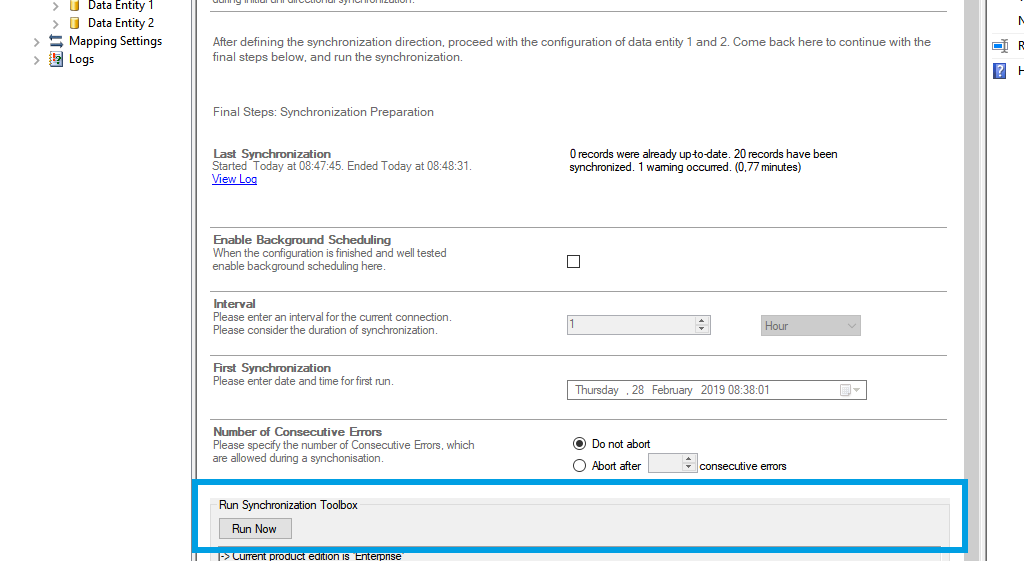
To run your connection switch back to the main connection configuration node and use the Run Now Button located on the bottom of the setup page. The Run Synchronization Toolbox will also display the synchronization process.
Below is a data preview of the information we have accessed in our source entity:
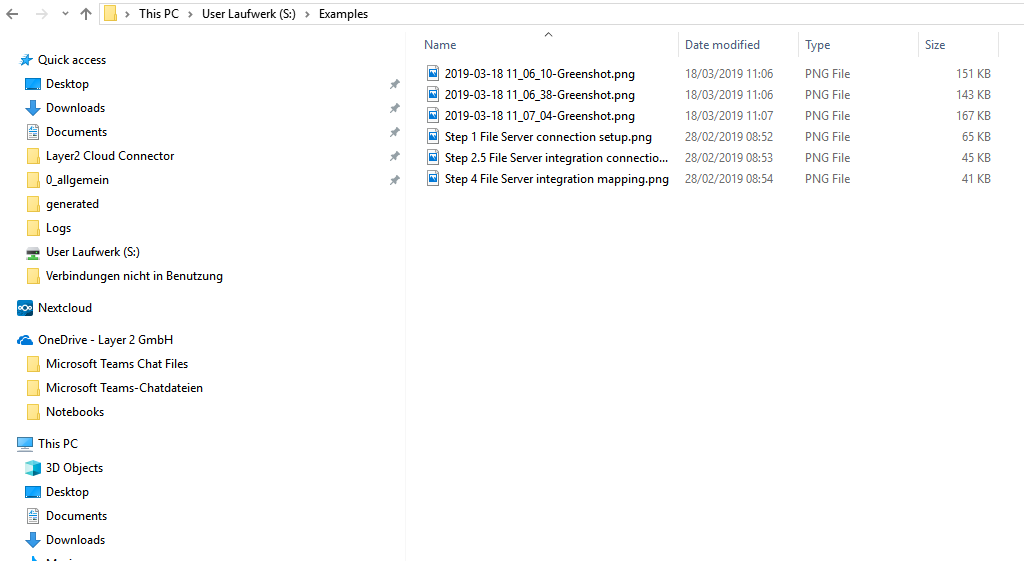
This will be the result in our Microsoft Teams channel after our initial successful synchronization:

Tutorials for Microsoft Teams
Integration, backup, synchronization and migration.
See the "How-to-connect" documentation to sync from a local file share to Microsoft Teams
See the "How-to-connect" documentation to post SharePoint Online List updates in Office 365 to a Microsoft Teams Channel via Microsoft Teams Channel Webhook
Check out our tips on how to get the best out of Microsoft Teams
A quick and easy backup or data recovery solution for your Microsoft Teams data
Work as usual on your traditional file share or local SharePoint. You can also use your browser or apps to access your work from anywhere and any device.
Stay compliant with Microsoft Teams with a simple but powerful backup to local file shares or your own Azure storage. Make use of your existing backup tools for disaster recovery or project archiving.
Migrate pre-selected documents to Microsoft Teams with flexible and advanced options, such as metadata mapping, or PowerShell automation.
File sharing is always the first step into a better collaboration. But what about connecting your backend IT systems to Microsoft Teams to automatically keep team members informed about any data changes?

