How to for OneDrive for Business: Sync shared folders, local file shares, home drives, and other corporate data
On this page you will learn how to synchronize and integrate OneDrive for Business and what OneDrive for Business is. We will answer the most frequently asked questions about "OneDrive For Business - sync shared folders".
Microsoft OneDrive for Business comes with a limited sync feature to keep personal files offline, such as on the user's tablet or mobile device. But how to sync corporate data like file shares, home drives etc., with OneDrive for Business to share in the cloud and access from anywhere on any device?
Microsoft OneDrive for Busines can be connected and synchronized without code and bi-directionally with any local file shares, home drives, etc., using the Layer2 Cloud Connector. You can sync more than 5.000 items per library.
You find a step-by-step tutorial below. If you want to start your Layer2 Cloud Connector free trial yet, you can download it now.
Prepare your file system source to integrate Microsoft OneDrive for Business to sync shared folders
For the best initial synchronization experience with Layer2 Cloud Connector, we recommend you make sure your file system is clean and free of any of the issues/restrictions known for Microsoft OneDrive for Business. Restricted file names, characters, and other issues are listed here.
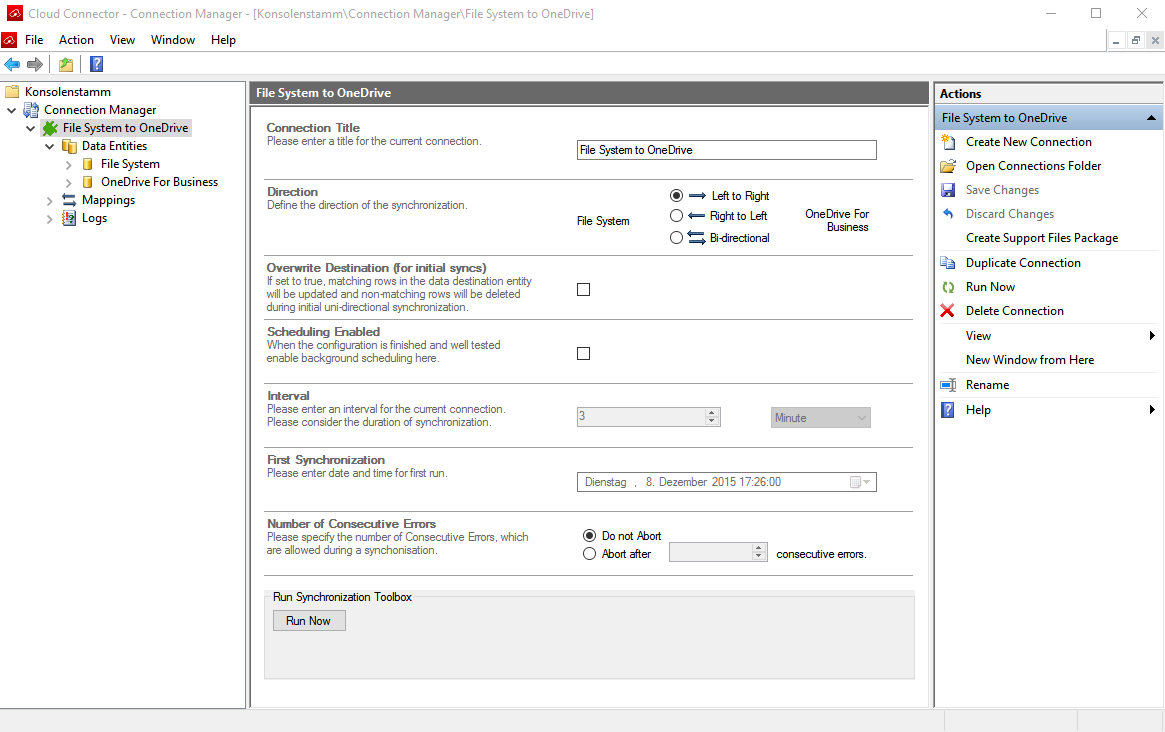
Step 1 - set up your File System to Microsoft OneDrive connection
This walk-through will be setting up a uni-directional sync from the specified file share location to Microsoft OneDrive for Business. It can be changed to bi-directional later, if you want to sync contents in both locations to each other. It is also a good idea to wait before enabling scheduling; this can be done after you confirm the connection is working normally with manual synchronizations.
Start with opening Layer2 Cloud Connector Connection Manager and click Create New Connection. You can also duplicate an existing example connection as a starting place.
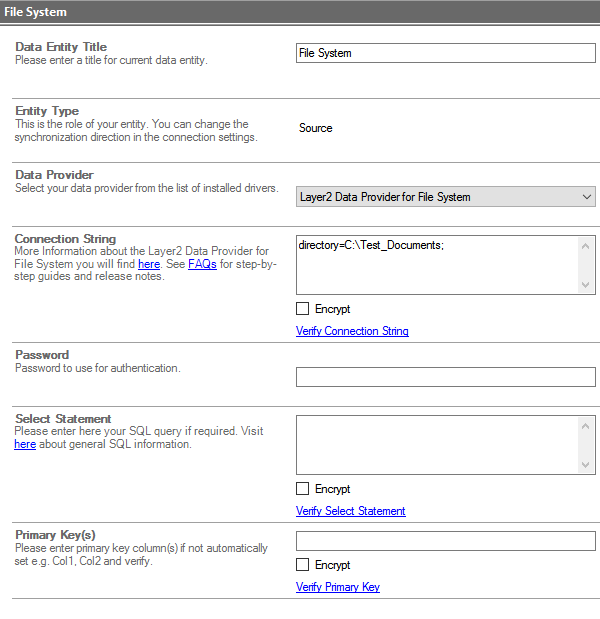
Step 2 - configure source data entity
Next step is to configure the Source data entity, which will be the file system location you want to pull files from.
In the left-hand column, expand the Data Entities node to see the Source and Target nodes. Select the Source node, which is the top one. Fill out the settings for a file system connection.
- Data Entity Title: Give your entity a meaningful name
- Entity Type: Should default to "Source"
- Data Provider: In the drop-down, select "Layer2 Data Provider for File System"
- Connection String: Directory=<pathToYourContent>;
In this example, it will be Directory=C:\Test_Documents; - The rest will be left blank/unset for now
Note that you can use UNC path notations for the directory, such as '\\myserver\myshare' or '\\127.0.0.1\C$\Test2'. By default, Integrated Authentication using the account the Layer2 Backend Service is configured to run with is used to access the file location. You can also give an account to use in the connection string (User=MyDomain\myUser;) and enter the password in the password field below the connection string.
Verify the connection works by clicking the Verify Connection String blue link, as well as clicking Preview Data in the right-hand menu to see the first 10 objects in the location given.
Step 3 - target configuration to your Microsoft OneDrive for Business document library
Next comes the Target configuration to your OneDrive for Business default Document library. First you need to gather the proper URL to use for the connection string. In a browser, navigate to your OneDrive for Business location. It should be in the new UI style. Click Return to classic OneDrive in the lower left-hand corner. In case this link is missing, you first need to click on Settings to get the link displayed on the Settings page.
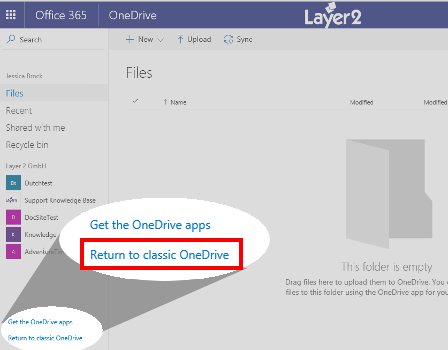
When the older UI reloads, the adjusted URL in the browser address bar is the correct one to use with the Cloud Connector. It should look something like this:
https://company-my.sharepoint.com/personal/myAccount/Documents/Forms/AllItems.aspx
Copy that URL to use for the next part. (If you are using a non-default location and need help getting the URL to use, see the "Other libraries or lists" section of the OneDrive solution page.)
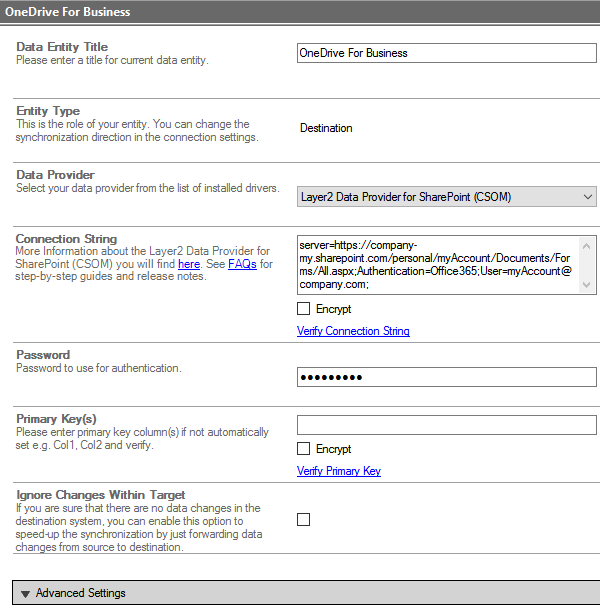
Select the Target node, which is the second one. Fill out the settings for a OneDrive connection, which is actually just a type of SharePoint Online connection.
- Data Entity Title: Give your entity a meaningful name
- Entity Type: Should default to "Destination"
- Data Provider: In the drop-down, select "Layer2 Data Provider for SharePoint (CSOM)"
- Connection String: url=http://mydomain.com/mySite/myLibrary/Forms/All.aspx; Authentication=Microsoft_Modern; [email protected];
- The URL=; parameter will be the URL you copied above from the browser.
- The rest will be left blank/unset for now
Verify the connection works by clicking the Verify Connection String blue link, as well as clicking Preview Data in the right-hand menu to see the first 10 objects in the location given.
Step 4 - settings for column mapping
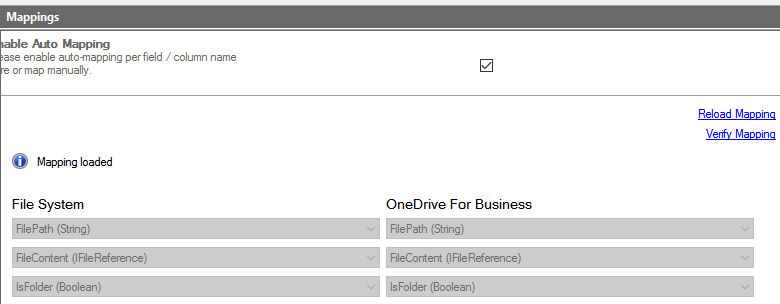
Lastly, comes setting the column mapping. Select the Mappings node from the left-hand column. It should default to have Auto Mapping enabled, which is fine for most file syncs.
Step 5 - run your configuration
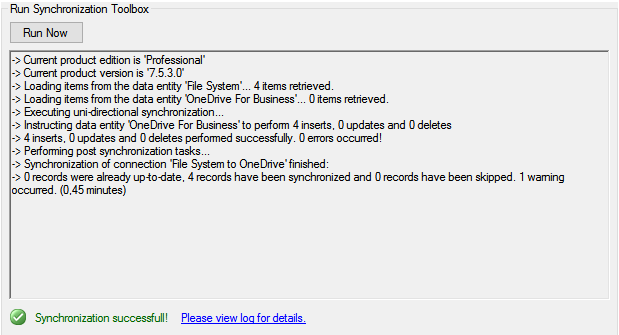
Your configuration is now complete and you can run the initial file synchronization. Click on the main connection node (with the green plug) in the left-hand column to select the connection settings. At the bottom is a Run Now button. Press that to start the sync!
If the sync finishes with errors, check the Logs node for more details. You can increase the log level in the Connection Manager root and run again to receive more detailed information.
Step 6 - mange your files in a Microsoft OneDrive for Business document library
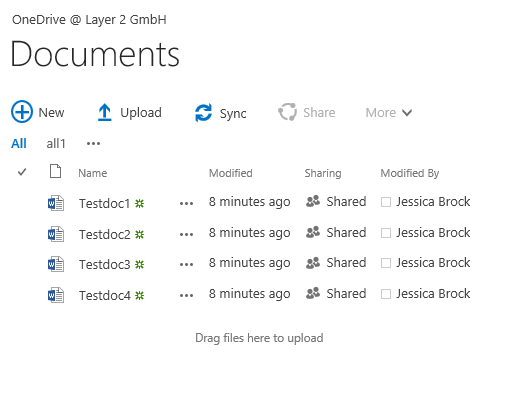
Now take a look at your OneDrive location. You should see all the files there from the file system.
If you are satisfied with the results, you can enable scheduling in the Connection Manager. It can be set to run every hour, every 10 minutes, or even shorter, depending on your needs.
Important information about syncing and integrating OneDrive for Business with Layer2 Cloud Connector
- All options of OneDrive for Business are fully available, such as file search, versioning, change notifications via RSS or email, workflows etc. You can access your files from any device and location.
- Files can be updated in background automatically by the Cloud Connector, with it only processing changed files. Please check your Connection Manager root for this. You can enable and disable Layer2 Cloud Connector Scheduling Service there.
- Bi-directional connections are supported as well.
- Layer2 Cloud Connector has no issues with the 5.000 items list view threshold. Some view options will become unavailable in this case. But you can still use your library with unsorted, ungrouped and unfiltered views or make use of indexed columns or managed metadata navigation. Search can be used without restriction to find files. However, take care to prepare your views before reaching the threshold as you may not be able to adjust them once you reach the limit. Alternatively, you can sync to several different libraries to keep things below the threshold.
- You can add additional unmapped columns for use only in OneDrive, e.g. managed metadata or feedback columns. Unmapped columns are kept as-is during updates.
- You can update specific columns with other connections, such as with database content.
- Folders are fully supported. You can even sync to specific folders of an already existing library.
- You can filter the data source file share for specific criteria, e.g. file types.
- You can add additional sync options like "no insert", "no update", "no delete" for specific requirements. Check the Advanced Settings section at the bottom of the data entities to access these.
- You can sync using the scheduling service, as well as on-demand (with command line).
- In this walk-through Auto Mapping is used, but you can also map specific columns with certain file metadata manually, if required.
What is OneDrive for Business and what are its main functions?
OneDrive for Business is a cloud-based storage service provided by Microsoft as part of the Microsoft 365 (formerly Office 365) suite of productivity tools. It is designed specifically for businesses and organizations to store, share, and collaborate on files and documents securely in the cloud.
File storage
OneDrive for Business provides users with a personal cloud-based storage space where they can store files and documents.
Collaboration
OneDrive for Business facilitates collaboration among team members by allowing them to share files and folders with specific individuals or groups. Multiple users can collaborate on the same document simultaneously.
Versioning
OneDrive for Business keeps track of versions of documents, enabling users to review and restore previous versions if needed.
Integration with Microsoft 365 apps
OneDrive for Business seamlessly integrates with other Microsoft 365 applications like Microsoft Word, Excel, PowerPoint, and Teams.
Security and compliance
OneDrive for Business includes security features such as encryption, access controls, and compliance tools to help protect sensitive data.
Offline access
Users can sync files from OneDrive for Business to their local devices, allowing them to work on files even when they are offline. Changes made offline will be synchronized with the cloud once an internet connection is reestablished.
Large file support
OneDrive for Business supports the storage and sharing of large files, making it suitable for a wide range of file types, including documents, images, videos, and more.
Overall, OneDrive for Business is a versatile and powerful cloud storage solution that enables businesses to enhance collaboration, improve accessibility, and ensure the security of their data.
Data integration and synchronization with OneDrive for Business made easy
If you haven't already tried Layer2 Cloud Connector, it's time to take the first step towards effortless connectivity. Start your Layer2 Cloud Connector trial and experience how easy it can be to connect Microsoft OneDrive for Business with file shares. Connect One Drive for Business safe and flexible.
Frequently asked questions about OneDrive for Business
We'll answer the most common questions about OneDrive for Business here.
Why can't I sync a shared OneDrive folder?
You can't sync folders when you don't have the permissions or when OneDrive isn't installed on your device.
How do I sync OneDrive with a network folder?
You can sync OneDrive with a network folder using Layer2 Cloud Connector. OneDrive doesn't natively sync with traditional network folders.
How do I link to a shared folder in OneDrive?
You can link to a shared folder in OneDrive using a link from the OneDrive web interface. With a right-click on the folder you can choose "share" to generate a link.
How does OneDrive for Business synchronize files?
OneDrive for Business synchronizes files between your local device and the cloud by using a sync client. When you want to synchronize it with other systems you can use tools like Layer2 Cloud Connector.
Why are my shared OneDrive folders not displayed?
Your shared OneDrive folders are not displayed when the sharing link has expired, the sharing settings have been changed or when the access is set incorrectly.
Why are the “sync” options for my OneDrive shared folder missing?
The "sync" options for your OneDrive shared folders are missing when the owner has restricted syncing for shared folders. It depends on the permissions granted by the owner. You can contact the folder owner to check the settings.

